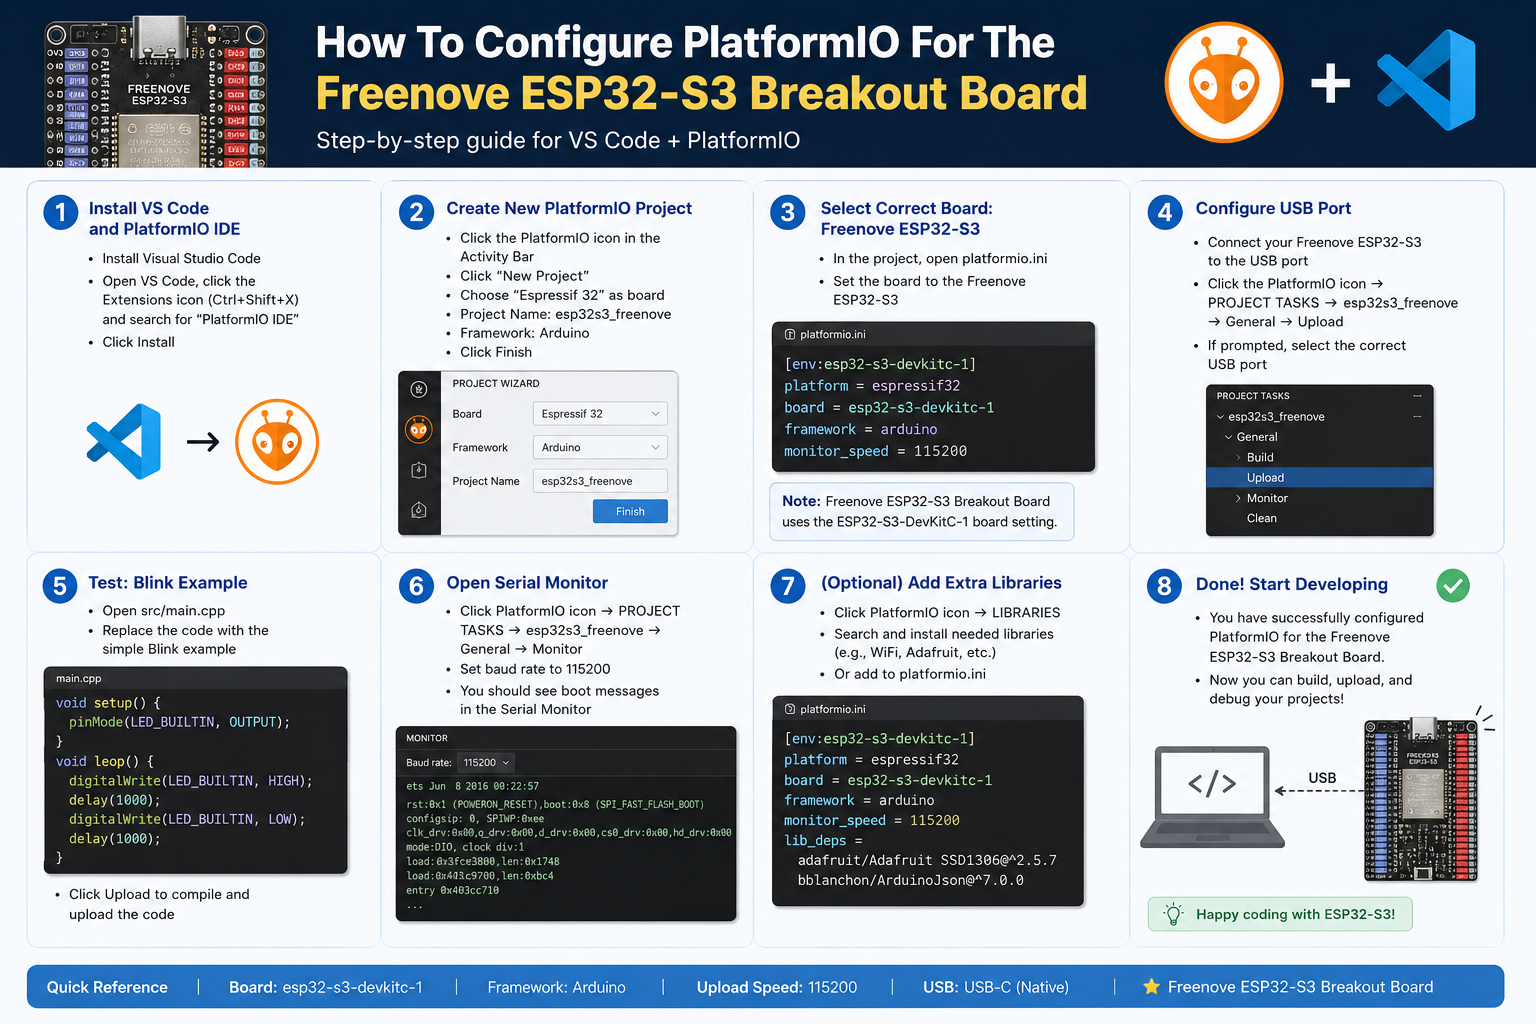
Configuring PlatformIO For The Freenove ESP32-S3 Breakout Board is an important step for building stable ESP32-S3 Projects, IoT Devices, smart sensors, wireless controllers, and embedded systems. The Freenove ESP32-S3 WROOM board uses the ESP32-S3 microcontroller, and PlatformIO lists the board ID as freenove_esp32_s3_wroom for the platformio.ini file.
With the right ESP32-S3 PlatformIO Configuration, developers can manage libraries, select the correct framework, enable PSRAM, upload firmware, and build projects faster. This guide explains how to set up the board, edit the platformio.ini file, install libraries, test Wi-Fi, and solve common errors.
What Is The Freenove ESP32-S3 Breakout Board?
The Freenove ESP32-S3 Breakout Board is a development board based on the ESP32-S3 chip. It supports Wi-Fi, Bluetooth, high-speed processing, GPIO expansion, and flexible embedded development. PlatformIO documents the Freenove ESP32-S3 WROOM N8R8 board with an ESP32S3 MCU, 240 MHz frequency, 8 MB flash, and 320 KB RAM.
This board is useful for ESP32-S3 IoT Development, ESP32-S3 Smart Home Projects, ESP32-S3 Sensor Projects, ESP32-S3 Wi-Fi Applications, and ESP32-S3 Embedded Systems. It gives makers and engineers a practical platform for testing prototypes before moving into PCB design or PCBA production.
Why Use PlatformIO For ESP32-S3 Development?
PlatformIO ESP32 Development makes embedded projects easier to manage. It works inside Visual Studio Code and supports project configuration, library management, board selection, serial monitor tools, build settings, and firmware uploading.
For developers who work with multiple ESP32 boards, PlatformIO is more organized than a simple sketch-based workflow. It keeps the project structure clean and stores key settings in the platformio.ini file. This helps when you need to repeat the same ESP32-S3 Firmware Development process across prototypes, test boards, and production hardware.
Step 1: Install PlatformIO In Visual Studio Code
The easiest way to start is to install Visual Studio Code first. Then open the Extensions panel and search for PlatformIO IDE. After installation, restart Visual Studio Code and open the PlatformIO home page.
This setup gives you a complete development environment for ESP32-S3 Programming, Arduino Framework ESP32 Projects, and embedded firmware testing. It also makes it easier to compile code, upload firmware, open the serial monitor, and manage external libraries.
Step 2: Create A New PlatformIO Project
Open PlatformIO and create a new project. Use a clear project name, such as Freenove_ESP32_S3_Project or ESP32_S3_WiFi_Test.
For the board option, choose Freenove ESP32-S3 WROOM if it appears in the board list. If you edit the file manually, use this board ID:
board = freenove_esp32_s3_wroomFor most beginners and fast prototypes, choose Arduino as the framework. For advanced firmware, real-time tasks, and deeper system control, ESP-IDF can also be used. However, the ESP32-S3 Arduino Framework is usually easier for quick testing, Wi-Fi examples, sensor reading, and smart device prototypes.
Step 3: Configure The Platformio.ini File
The platformio.ini file controls the board, platform, framework, flash settings, libraries, monitor speed, and upload behavior. A basic Freenove ESP32-S3 PlatformIO Configuration can look like this:
[env:freenove_esp32_s3_wroom]
platform = espressif32
board = freenove_esp32_s3_wroom
framework = arduino
monitor_speed = 115200
This tells PlatformIO to use the Espressif 32 platform, the Freenove ESP32-S3 WROOM board, and the Arduino framework. The official PlatformIO board page also shows freenove_esp32_s3_wroom as the correct board option for the project configuration file.
Step 4: Enable Flash And PSRAM Settings
Many ESP32-S3 projects need extra memory, especially when using displays, image processing, web servers, camera features, JSON data, or complex IoT functions. If your board version includes PSRAM, enable it in the configuration.
[env:freenove_esp32_s3_wroom]
platform = espressif32
board = freenove_esp32_s3_wroom
framework = arduino
monitor_speed = 115200
board_build.flash_size = 8MB
board_build.psram = enabled
This ESP32-S3 PSRAM Configuration can help prevent memory-related errors in larger projects. It is especially useful for ESP32-S3 Camera Projects, ESP32-S3 Web Server Projects, ESP32-S3 Display Projects, and advanced ESP32-S3 IoT Applications.
Step 5: Add Useful Libraries
Many projects need extra libraries for Wi-Fi, sensors, web servers, MQTT, Bluetooth, OLED displays, or cloud communication. You can install libraries through the PlatformIO Library Manager or add them directly inside platformio.ini.
For example, a simple Wi-Fi web project may use:
lib_deps =
    ESP32Async/AsyncTCP
    ESP32Async/ESPAsyncWebServer
For an ESP32-S3 MQTT Project, you may add an MQTT client library. For an ESP32-S3 Sensor Dashboard, you may add sensor, display, and web server libraries. Keeping library dependencies inside platformio.ini makes the project easier to share, rebuild, and maintain.
Step 6: Write A Simple Wi-Fi Test Program
After the project is ready, open src/main.cpp and add a simple test sketch. This confirms that your ESP32-S3 Wi-Fi Setup works correctly.
#include <Arduino.h>
#include <WiFi.h>

const char* ssid = "Your_WiFi_Name";
const char* password = "Your_WiFi_Password";

void setup() {
  Serial.begin(115200);
  delay(1000);

  Serial.println("Connecting To Wi-Fi...");
  WiFi.begin(ssid, password);

  while (WiFi.status() != WL_CONNECTED) {
    delay(500);
    Serial.print(".");
  }

  Serial.println();
  Serial.println("Connected To Wi-Fi");
  Serial.print("IP Address: ");
  Serial.println(WiFi.localIP());
}

void loop() {
}
This basic code is useful for testing ESP32-S3 Wireless Development, router connection, serial output, and upload settings. Once this works, you can move on to sensors, cloud platforms, web control, MQTT communication, or smart home automation.
Step 7: Upload Firmware To The Freenove ESP32-S3 Board
Connect the board to your computer with a suitable USB cable. Then click Upload in PlatformIO. If the upload works, open the serial monitor and check the output.
Use this setting if you want a stable serial monitor speed:
monitor_speed = 115200If the upload fails, try holding the BOOT button while starting the upload. Some ESP32-S3 boards need manual boot mode during flashing. You can also try a different USB cable, USB port, or driver installation if the board does not appear.
Common PlatformIO Problems And Fixes
Board Not Found Error
If PlatformIO shows an unknown board error, check the spelling of the board ID. The correct ID is:
board = freenove_esp32_s3_wroomDo not write oard or use a wrong board name. A small typo in platformio.ini can stop the build process.
You can also update PlatformIO and the Espressif platform:
pio update
pio platform update espressif32
This can help when your local PlatformIO environment does not include the latest supported board definitions.
Upload Failed Error
Upload errors often come from USB cable issues, driver problems, wrong port selection, or boot mode problems. Use a data-capable USB cable, not a charging-only cable. Then check the device port in PlatformIO.
If needed, add an upload port:
upload_port = COM3On macOS or Linux, the port may look different:
upload_port = /dev/ttyUSB0For stubborn upload problems, hold BOOT, click Upload, and release BOOT when the upload starts.
Serial Monitor Shows Nothing
If the serial monitor is blank, make sure your code uses the same baud rate as PlatformIO.
Serial.begin(115200);Then use:
monitor_speed = 115200Also confirm that your program has uploaded successfully. If old firmware remains on the board, the serial output may not match your current code.
Memory Errors During Build Or Runtime
Memory errors can happen when a project uses large libraries, camera functions, display buffers, web servers, or complex data processing. To improve stability, enable PSRAM when your board supports it.
board_build.psram = enabledYou can also reduce large buffers, remove unused libraries, optimize JSON size, and split complex code into smaller functions. These steps help improve ESP32-S3 Memory Management and firmware stability.
Library Conflict Errors
Library conflicts usually happen when multiple libraries include similar dependencies or when an old library does not support ESP32-S3 correctly. Check the build log and remove unused libraries from lib_deps.
For a clean ESP32-S3 PlatformIO Project, only add the libraries you really need. This keeps the firmware lighter and makes debugging easier.
Best Platformio.ini Example For Freenove ESP32-S3
Here is a practical configuration for many Arduino-based projects:
[env:freenove_esp32_s3_wroom]
platform = espressif32
board = freenove_esp32_s3_wroom
framework = arduino
monitor_speed = 115200
board_build.flash_size = 8MB
board_build.psram = enabled
lib_deps =
    ESP32Async/AsyncTCP
    ESP32Async/ESPAsyncWebServer
This setup works well for many Web Server Projects, IoT Devices, Smart Control Boards, and Wi-Fi Prototypes. For simpler projects, you can remove the library section and keep only the basic configuration.
Best Projects To Build With Freenove ESP32-S3
After configuring PlatformIO, the Freenove ESP32-S3 breakout board can support many practical applications.
You can build an IoT Weather Station with temperature, humidity, air pressure, and cloud data logging. You can also create an Smart Home Controller for lights, relays, fans, or appliances.
For more advanced products, the board can support an Web Server Dashboard, Bluetooth Device, Sensor Gateway, MQTT Controller, or Wireless Monitoring System. These projects are useful for learning, prototyping, and preparing custom PCB designs.
Tips For Stable ESP32-S3 Development
A stable ESP32-S3 Development Board Setup depends on both software and hardware. Use a reliable USB cable, a stable power source, clean wiring, and correct pin assignments. Avoid connecting high-current loads directly to GPIO pins.
When testing sensors or modules, check voltage levels before wiring. Many ESP32-S3 pins use 3.3 V logic. Wrong voltage can damage the board or cause unstable behavior.
For long-term projects, keep your PlatformIO project organized. Use clear folder names, comment important code, document pin connections, and keep the platformio.ini file simple.
When To Move From Breakout Board To Custom PCB
A breakout board is excellent for testing, but a product usually needs a custom PCB. After the firmware works, engineers can move the design into PCB Design, PCB Layout, and PCBA Manufacturing.
At this stage, the design should consider power stability, antenna clearance, USB routing, boot mode pins, reset circuit, GPIO protection, test points, and manufacturing requirements. A good custom PCB can reduce wiring problems and improve product reliability.
For commercial products, firmware development and hardware design should work together. A stable PlatformIO project helps the engineering team test the firmware before final assembly.
Final Thoughts
Learning How To Configure PlatformIO For The Freenove ESP32-S3 Breakout Board makes ESP32-S3 development faster and more reliable. The key steps are simple: install PlatformIO, create a project, select the correct board ID, edit platformio.ini, enable PSRAM when needed, add the right libraries, upload a test program, and fix common errors step by step.
With a clean ESP32-S3 PlatformIO Setup, developers can build Wi-Fi projects, smart home devices, sensor systems, web dashboards, MQTT controllers, Bluetooth applications, and custom IoT products. A well-configured development environment also makes it easier to move from prototype testing to custom PCB design and final electronic product manufacturing.